
1. Sync Editing
In Flowblade Movie Editor sync editing workflow is to set clip's positions to follow another clip's positions on request.
- Sync relation between two clips is set by either setting relation individually, doing audio splits or setting sync relation for all clips on a track or a box selection in single action
- Clips that have lost sync with their parent clips can be resynced one or more at a time or by resyncing a whole track in single action.
Below we give suggested workflows for three typical use cases for utilizing Flowblade's sync editing features.
- Generic work preserving sync editing.
- Editing to audio, such as when creating music videos or voice over driven programs.
- Dialogue editing.
Setting up Sync Relations
There are three ways to set up a sync relation between clips:
Clip Parenting
Explicitly set Sync relation between two clips set up by selecting a Sync Parent Clip for a Sync Child Clip.
- Click Right Mouse on clip and select Edit->Select Sync Parent Clip....
- Or Click Right Mouse on clip that is part of a multiclip selection and select Select Sync Parent Clip....
- Cursor turns into a Target Cross. Click on a clip to select it as Sync Parent Clip.
Audio Splitting
Split a video clip into two clips: a muted video clip as Sync Parent Clip and an audio clip as Sync Child Clip.
- Click Right Mouse on clip and select Audio Edit->Split Audio Synched.
- When multiple Clips are selected click Right Mouse on clip and select Split Audio Synched.
- A new synched Audio Clip/s is placed on audio track, either on V1 or mirrored track based on current preference.
- If you select from Sync Properties menu property Auto Sync Split Video Clips on Add video clips will be split automatically when added to certain tracks.
Track Auto Parenting
Set all clips on track as Sync Child Clips to closest clips on the selected Track as Sync Parent Clips.
- Click Right Mouse on a track in the left side tracks Column area and select Sync All Clips To Track... .
- Select sync parenting target track using the dialog window.
- A sync relation is created for all Clips on Track.
- An icon appears on Track Head in in the Tracks Column to indicate that updating sync is now possible.
- Once a Track has been auto parented it remembers the target track and parenting can be updated by clicking Right Mouse on a Track Head and selecting Update Sync to Clips' Current Positions.
- Click Right Mouse on a Track Head and select Clear Sync to clear all sync relations on a Track and info on parenting target Track.
Box Selection Parenting
Parent selected clips to the first clip on track closest to track V1.
- Drag Left Mouse to select clips on multiple tracks.
- Press button Set Sync for All Clips on Track or Box Selection.
- All selected clips on other tracks are parented to the first clip in selection on track closest to track V1. Clips on track closest to track V1 are not parented.
Resyncing
Single Clip
- Click Right Mouse on Sync Child Clip and select Edit->Resync from popup menu to resync single clip.
- Press Resync Selected Clips Button to resync single clip.
Multiple Clips
- Press Resync Selected Clips Button to resync selected clips clip.
- Click Right Mouse on Sync Child Clip that is part of a multiclip selection and select Resync from popup menu to resync single clip.
All Clips on a Track
- Select from application menu Edit->Resync Track to resync all clips in the track containing currently selected clip.
- Press Resync Track Containing Selected Clip Button to resync all clips in the track containing currently selected clip.
Clearing Sync Parent Relations
- Click Right Mouse on Sync Child Clip and select Edit->Clear Sync Relation.
- Or Click Right Mouse on clip that is part of a multiclip selection and select >Clear Sync Relations.
Workflows
Generic work preserving sync editing
Most edits require clips on different tracks to maintain positions relative to each other, such as a title placed on top of a video clip.
Many edit actions necessarily change the positions of clips differently on different tracks. Sync editing tools provide quick workflow to regain sync between clips.
- It is often useful to treat track V1 as a master track, and have all other tracks relate positions to track V1.
- Set sync relations for individual or multiple selected clips.
- If there exists many clips of similar type that require syncing, dedicate a track to that type of clips and use track syncing features to keep that track in sync.
- If program features multiple clearly defined complex scenes one approach is to:
- Parent first clip of the scene on each track to the first clip of scene on track V1. Box Selection Parenting can be a useful action to get this done quikly.
- Use Spacer tool with Control modifier to sync tracks manually at scene start when needed.
- Or use track syncing.
Editing to audio
When creating music videos or voice over driven programs it is useful to use a single audio track as sync target track for most are all other elements in the sequence.
- Place the program defining audio of track A1 and treat that as a master track.
- Have all other tracks and clips relate their positions to track A1.
- With music videos it is useful to use a large number of track dedicated to individual types of visual elements, and use exclusively track syncing features instead of setting sync to individual clips.
Dialogue editing
Editing dialogue scenes frequently require actor's voice to start before or end after the image of the character speaking. These types of edit are knowns as J- and L-cuts.
- Dedicate tracks V1, V2, A1 and A2 to dialogue video and audio.
- Select from Sync Properties menu on the left behaviour that suits your preferences.
- Auto Sync Split Video Clips on Add has multiple options to select which tracks do this.
- Audio Split To Mirrored Track behaviour can be turned on and off.
- When creating J- or L-cuts use methods that maintain sync to minimize the need to resync:
- When using Trim tool, use Two Roll Trim instead of One Roll Trim.
- When dragging clip ends use Alt modifier to do Clip End Overwrite Drag actions.
- Use exclusively track resyncing actions to keep audio on tracks A1 and A2 synced.
Sync UX
Buttons
There are 4 buttons in the Middlebar, from left to right:
- Split Audio Synched
- Set Sync for All Clips on Track or Box Selection. If a box selection is active then Box Selection Parenting is done, othrewise a Track Auto Parenting action is performed
- Resync Track Containing Selected Clip/s
- Resync Selected Clips
Menus
There are 4 menus available at various places to provide sync editing functionality:
- Sync Properties Menu above Tracks Column allows for setting sync editing properties.
- Track Menu available in Tracks Column provides track sync actions.
- Clip Menu provides sync actions applied to single clips.
- Multi Clip Selection Menu provides sync actions applied to multiple clips.
Timeline
Visually clip's sync state is displayed as follows:
- Red box with a number means that clip is not in sync with parent.
- Displayed number gives info on how many frames a clip's position is away from being synched.
- Optionally a line is drawn between parent and child clip.
2. Advanced Project Actions
Combining Sequences
It is possible to import full contents of another Sequence into Sequence currently being edited.
- Select Sequence->Import Another Sequence into this Sequence...
- Select Import action.
- Append Sequence adds imported Sequence at the end of current Sequence
- Insert Sequence at Playhead Position creates a cut at playhead position and inserts imported Sequences at that position
- Select a Sequence to Import
- Note that you obviously need at least two Sequences to exist to do any import actions.
- Press Import button to execute import.
Split part of Sequence to new Sequence
- Select Sequence->Split to new Sequence at Playhead position
- After confirmation dialog the a new Sequence with contents of source Sequence after playhead position will be created and made active.
Importing Media from another Project
You can import Media Items from another Project.
- Select Project->Import Media From Project...
- Select a Project file from file system.
- Media items that are not present in current Project will be opened in the current bin. Note that it takes a few seconds to load the project before new Media Items begin to appear.
3. Timeline Audio Syncing
You can make a clip to move to a position in timeline in which its audio is in sync with audio of another clip on timeline.
This enables you to do simplified version of multicam editing on the timeline.
- Open context menu with Right Mouse on Clip you wish to sync with some other clip.
- Select menu item Audio->Select Clip to Audio Sync With.... The cursor changes to a targeting cross.
- Click on Clip you wish to audio sync with.
- A dialog opens giving info on the sync action that is to be done to sync clips.
- Press Do Audio Sync Move Edit button to do the syncing edit.
- It is usually a good idea to mute one of the synched clips
4. Slow / Fast Motion and Reverse
In Flowblade there are two ways to do motion effects:
- Changing Clip Speed and direction in Timeline
- Creating new New Media Items in Bins
Changing Timeline Clip Speed and direction
Creating Slow / Fast Motion Clips
- Right click on a Timeline Clip File and select Slow Motion -> Slow / Fast from popup menu.
- Edit parameters for the new motion Clip
- Set speed
- Set encoding and quality
- Select render range, either:
- Current Clip Content
- Full Media
- Click Render button to create a new motion Timeline Clip.
Creating Reverse Motion Clips
- Right click on a Timeline Clip File and select Slow Motion -> Reverse from popup menu.
- Edit parameters for the new motion Clip
- Set speed
- Set encoding and quality
- Select render range, either:
- Current Clip Content
- Full Media
- Click Render button to create a new reverse Timeline Clip.
Creating Motion Media Items
Creating Slow / Fast Media Items
- Right click on a Media File and select Render Slow / Fast Motion File from menu
- Edit parameters for the new motion Clip
- Set speed
- Give name and location for motion Clip
- Select rendering parameters for motion Clip. It is probably a good idea to use a lossless format here to avoid any generational quality losses.
- Select render range, either:
- Full Source Clip
- From Source Clip Mark In to Mark Out
- Click Render button to create a new motion Media Item
Creating Reverse Media Items
- Right click on a Media File and select Render Reverse Motion File from menu
- Edit parameters for the new motion Clip
- Set speed
- Give name and location for reverse Clip
- Select rendering parameters for reverse Clip. It is probably a good idea to use a lossless format here to avoid any generational quality losses.
- Select render range, either:
- Full Source Clip
- From Source Clip Mark In to Mark Out
- Click Render button to create a new reverse Media Item
5. Filter Masking
Filter masking allows for one or more filters to be applied only on some user defined part of image.
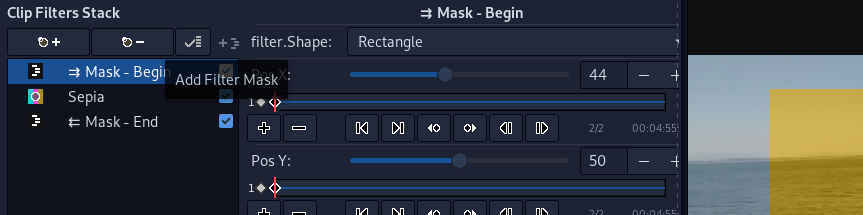
1) Filter masking menu launch button above red triangle, 2) Filters editor after adding mask with all filter edit panels minified. Mask - Begin and Mask - End filters define which filters are masked.
- Click Filter Mask Menu launch button and select if you wish to apply mask on one or all filters.
- In submenu select mask Alpha Shape, Alpha Shape Motion Tracked, Luma Key, Video/Image File Alpha, Video/Image File Luma or Color Select.
- Edit mask parameters in filter edit panel for Mask - Begin filter.
- You can movefilters in and out of the masked range of filter stack.
6. Motion Tracking
When creating a motion tracking effect we are usually dealing with two image sources: one that contains the image element that is being tracked, and an another image that follows the tracked image element.
When using motion tracking to create a tracking filter mask, then both tracking data source clip and the clip that has the masked filter applied are usually the same clip.
Flowblade implements motion tracking by providing two filters and a filter mask. Filters are:
- Motion Tracking Create This filter creates the tracking data based on region of image and algorithm selected by the user.
- Motion Tracking Apply This filter applies tracking data on another image to follow the image element that was the source of the tracking data.
Motion tracked masked filtering uses Filter Mask: Alpha Shape Motion Tracked, see below.
Filter: Motion Tracking Create
Add this filter to clip that contains the image element you wish to track.
Parameters
Rectancle GUI Editor Set the red rectangle on the image element you wish to track.
Tracking always starts from first frame of clip, so use the first frame to position the rectangle.
If you like tracking to start in the middle of a clip, then cut clip at that point to create a new clip that has the first frame at the position you wish the tracking to start.
Keyframe Step This sets the interval in frames between keyframes in the created tracking data. So e.g. value 5 creates a keyframe every 5 frames.
Algorithm Algorithm used to create the tracking data.
- KCF - Kernelized Correlation Filters Accuracy and speed better than MIL. This also reports tracking failure better than MIL. Does not recover from full occlusion.
- MIL - Multiple Instance Learning Performance is quite good, can work when presented with partial occlusion. Tracking failure not reported reliably. Does not recover from full occlusion.
- MEDIANFLOW Excellent tracking failure reporting. Works very well when the motion is predictable and there is no occlusion. Fails under large motion.
- MOSSE - Minimum Output Sum of Squared Error MOSSE tracker is robust to variations in lighting, scale, pose, and non-rigid deformations. It also detects occlusion and can pause and resume where it left off when the object reappears.
- CSRT Among these algorithms CSRT often shows comparatively better accuracy and resistance to overlapping by other objects. Speed is quite low, and operation is unstable when the object is lost.
Create Motion Tracking Data Pressing this button creates a motion tracking data labeled with name given in the text entry box above. After creation data can be used with Motion Tracking Apply filter or Filter Mask: Alpha Shape Motion Tracked.
Workflow
- Make sure playhead is on the first frame of the tracked clip.
- Place red rectangle on top of the tracked image element.
- Set parameters and give the data to be created an identifying name.
- Press Create Motion Tracking Data and wait for the data render to complete.
- Check results by moving the playhead around.
- Press Clear Data button if you wish to try again with different parameters or tracking area definition.
Filter: Motion Tracking Apply
Add this filter to the clip that contains the image that you wish to make follow the tracked image element.
Place the clip with tracking image on top of the clip with tracked image and apply cropping if necessary.
Parameters
Select Motion Tracking Data Select the labeled tracking data created from tracking image element you wish to track.
Tracking always starts from first frame of clip.
If you like tracking to start in the middle of a clip, then cut that clip at that point to create a new clip that has the first frame at the position you wish tracking to start.
Tracking Coords Interpretation
- Absolute Places the top left corner of the image to the top left corner of the tracking data box.
- Top Left Justified Places the top left corner of image to the top left corner of screen in the first frame of tracking, and then moves image relatively as specified by tracking data. This is useful e.g. when making a text created in Titler (that is placed initially correctly) keep position when tracking data is applied.
X Offset Moves image in the horizontal direction in relation to the position defined by tracking data.
Y Offset Moves image in the vertical direction in relation to the position defined by tracking data.
Size If set to Scale To Box image is scaled to fit the box defined by tracking data.
Apply Motion Tracking Data Applies selected tracking data with user specified parameters as motion of the clip.
Workflow
- Use Select Motion Tracking Data dropdown menu to select which tracking data to apply.
- Set parameters to fine tune tracked motion.
- Press Apply Motion Tracking Data button to make clip image follow tracked motion.
- If needed, change parameters and press Apply Motion Tracking Data button again to get changed motion.
Filter Mask: Alpha Shape Motion Tracked
Add this Filter Mask to clip that contains the image element you wish to apply masked filtering on.
A typical use would be to e.g. blur a person's face to make them unrecognizable.
Parameters
Select Motion Tracking Data Select the labeled tracking data created from tracking image element you wish to track.
Tracking always starts from first frame of clip.
If you like tracking to start in the middle of a clip, then cut that clip at that point to create a new clip that has the first frame at the position you wish tracking to start.
X Offset Moves filtered area in the horizontal direction in relation to the position defined by tracking data.
Y Offset Moves filtered area in the vertical direction in relation to the position defined by tracking data.
Scale Makes filtered area smaller or larger.
Apply Motion Tracking Data Applies selected tracking data with user specified parameters as a Filter Mask.
Workflow
- See above how to add a Filter Mask. Select Filter Mask Alpha Shape Motion Tracked.
- Set mask parameters.
- Press Apply Motion Tracking Data to create a motion tracked filter mask.
8. Stabilizing
In Flowblade stabilizing a video clip is implemented using filter Stabilize available in filter category Movement or by creating a new, stabilized Media Item..
This filter requires two passes. The first pass performs analysis and stores the result internally in a file. After completed analysis stabilizing can be applied using the created data.
Parameters
Analysis Shakiness Used during analysis. How shaky the video is.
Accuracy Used during analysis. The accuracy of shakiness detection.
Smoothing Used during application. Number of frames for lowpass filtering (2N + 1 frames).
Zoom Used during application. Additional zoom amount.
Analyze Video Pressing this button analyzes video and saves the created data internally. Upon completion stabilizing is applied and can be controlled using Smoothing and Zoom parameters.
Creating Stabilized Media Item
- Select Render Stabilized File item from Media Item Right mouse context menu.
9. Credits Scroll Generator
Overview
Flowblade offeres a Credits Scroll Generator to easily create title sequences.
Credits Scroll Generator has a number of editors to set initial properties of text font and layout. Displayed text and commands to modify text presentation is inputted in text editor box in the Text panel.
Text is given using a light weight markup syntax that accepts three types of input: credit blocks, section titles and commands.
Credit Blocks
Credit block is a block of text beginning with a line starting with '#' followed by credit text, followed by one or more sequential lines giving names associated with the credit.
Credit block ends when empty line is encountered.
# Camera operators
Donald Drake
Earl Easter
Section Titles
Section Title is a single line of text starting with '##' and followed by section title text.
## Camera crew in Antarctica
Commands
Command is a single line of text starting with '!' and followed by command arguments.
Command lines change font and layout properties from the ones given initially by user or do some other additional changes in the way that text is presented.
! set-layout single-line-sides-justified
Commands List
ypad ypad PIXELS
Adds padding between credit items.
E.g. ! ypad 40
set-layout set-layout [single-line-centered | two line-centered | single-line-right-justified | two-line-right-justified | single-line-sides-justified | two-line-left-justified | two-columns-centered ]
Switches to use defined credit item layout.
E.g. ! set-layout single-line-sides-justified.
text-case [ credit | name ] [ no-changes | uppercase | lowercase ]
Sets credit or name text to be uppercase, lowercase or as written.
E.g. ! text-case name lowercase
page [ PAGELENGHT]
Begins new text page if animation set to be paged. Optionally sets length of time page is displayed in frames. If no time is given, the user set default value is used.
E.g. ! page 230
font-size [ credit | name ] FONTSIZE
Sets font size for credit or name text.
E.g. ! font-size credit 100
font-family [ credit | name ] FONTFAMILY
Sets font family for credit or name text. Available values for FONTFAMILY depend on system.
E.g. ! font-family credit Ubuntu Sans
font-face [ credit | name ] [ regular | italic | bold ]
Sets font face for credit or name text.
E.g. ! font-face name italic
font-property [ credit | name ] [alignment | color-rgba | fill-on | outline-color-rgba | outline-on | outline-width | shadow-on | shadow-color-rgb | shadow-opacity | shadow-xoff | shadow-yoff | shadow-blur | gradient-color-rgba | gradient-direction ] PROPERTYVALUE
Sets value for named font property for credit or name text. Allowed PROPERTYVALUE values are different for different named properties.
Font Properties
| Property | Value type | Example |
|---|---|---|
| color-rgba | color tuple | color-rgba (1.0,0.0,0.0,1.0) |
| fill-on | boolean | fill-on False |
| outline-color-rgba | color tuple | outline-color-rgba (1.0,0.0,0.0,1.0) |
| outline-on | boolean | outline-on True |
| outline-width | int (pixels) | outline-width 4 |
| shadow-on | boolean | shadow-on True |
| shadow-color-rgb | color tuple | shadow-color-rgb (1.0,0.0,0.0,1.0) |
| shadow-opacity | int[0-100] | shadow-opacity 50 |
| shadow-xoff | int (pixels) | shadow-xoff 10 |
| shadow-yoff | int (pixels) | shadow-yoff 7 |
| shadow-blur | int (pixels) | shadow-blur 8 |
| gradient-color-rgba | color tuple | gradient-color-rgba (1.0,0.0,0.0,1.0) |
| gradient-direction | int[0,1] (VERTICAL = 0 HORIZONTAL = 1) | gradient-direction 1 |
E.g. ! font-property credit color-rgba (1.0,0.0,0.0,1.0)
! font-property name outline-on True
! font-property credit shadow-yoff 7
! font-property name gradient-direction 1
set-layout-property [ center-gap | line-gap | credit-block-gap | justified-x | justified-x-off | name-y-off | name-x-off | section-title-alignment ] PROPERTYVALUE
Sets layout property value. PROPERTYVALUE integer value for number of pixels or pixel position.
| Property | Description |
|---|---|
| center-gap | Gap between name and credit when on same line. |
| line-gap | Gap between lines. |
| credit-block-gap | Gap between credit blocks. |
| justified-x | Position of justified edge when using justified text layouts. |
| justified-x-off | Sets column width in "Single Line Sides Justified" layout. |
| name-y-off | Y offset of name position from default position in current layout. |
| name-x-off | X offset of name position from default position in current layout. |
| section-title-alignment | Sets section titles to be either centered or edge justified using justified-x value. |
E.g. ! set-layout-property name-y-off -100
10. Jog / Shuttle Support
Overview
Flowblade has a USB Human Input Device subsystem, which is capable of supporting selected USB jog/shuttle devices.
A jog/shuttle gives you an additional way to navigate through your timeline using a dedicated hardware control interface, in addition to the keyboard and mouse.
Turning the jog wheel moves the playback location forward and backward, one frame at a time.
Turning the shuttle left or right engages variable speed playback, in forward or reverse. The farther you turn the ring, the faster it goes.
Additionally, most jog/shuttle devices have keys which can be mapped to various actions within the program. Each supported device has default key mappings, which can also be customized.
Supported Devices
| Manufacturer Device Name | Flowblade Device Name | Config File |
|---|---|---|
| Contour Design ShuttlePRO v2 | Contour Design ShuttlePRO v2 | contour_design_shuttlepro_v2.xml |
| Contour Design ShuttleXpress | Contour Design ShuttleXpress | contour_design_shuttlexpress.xml |
| Contour A/V Solutions SpaceShuttle | Contour Design ShuttleXpress | contour_design_shuttlexpress.xml |
Enabling Jog / Shuttle Support
Jog/shuttle support is not on by default in Flowblade, and must be enabled.
Additionally, Flowblade will not be able to access the USB device without a small amount of operating system configuration to grant permissions so that Flowblade is allowed to use the device.
Enable Device Permissions
In order for Flowblade to be able to read from the USB device, it is necessary to tell your operating system to grant permissions on the device to non-root users.
On Linux, this is done by adding a udev rules configuration file that instructs the udev subsystem to enable additional access to your device.
Become the root user, and create a new text file at `/etc/udev/rules.d/90-flowblade.rules` with the following contents:
# Grant unprivileged users access to USB HID jog/shuttle devices
# Contour Design ShuttleXpress, Contour A/V Solutions SpaceShuttle
ATTRS{idVendor}=="0b33", ATTRS{idProduct}=="0020", MODE="0666"
# Contour Design ShuttlePRO v2
ATTRS{idVendor}=="0b33", ATTRS{idProduct}=="0030", MODE="0666"
It may be necessary to reboot your computer after this step. This only needs to be done once. It is also possible to tell the udev subsystem to reload the config file instead of rebooting, but this is left as an exercise for the reader.
Don't forget to drop your root privileges after this step, before starting Flowblade! Do not run Flowblade as root!
Tell Flowblade to Use the Device
The next step is opening Flowblade, and enabling your device.
Go to the Edit menu, select Preferences, and then navigate over to the Jog/Shuttle tab.
Check the USB Jog/Shuttle Enabled checkbox.
In the Device pull down menu, select the device driver that you wish to use. The entries in this menu correspond to the Flowblade Device Name in the Supported Devices section above.
Press OK to close the Preferences window.
After this, it will be necessary to exit Flowblade and restart it.
At this point, the USB jog/shuttle configuration is part of your saved Flowblade preferences. You will now be able to use the program with or without the jog/shuttle, without any further configuration necessary.
Please note that Flowblade will only check for the presence of the USB device at startup, so make sure to have the device plugged in before you start Flowblade if you want to use it.
Custom Key Mappings
Flowblade ships with XML config files that provide default key mappings between the keys on your USB jog/shuttle device, and various actions in Flowblade. It is possible to customize these mappings, by copying the appropriate file into the correct user preferences directory, and modifying the local copy.
The precise location of these config files can vary depending on how you have installed Flowblade. You want to find the `res/usbhid` directory under the Flowblade installation. From there, you will want to copy the config file for your particular USB jog/shuttle device to a location in your local user preferences directory.
For example, if you installed Flowblade on Ubuntu using the OS packaging system, and you have a Contour Design ShuttleXpress, then you would want to copy the `/usr/share/flowblade/Flowblade/res/usbhid/contour_design_shuttlexpress.xml` file into `.local/share/flowblade/user_usbhid/contour_design_shuttlexpress.xml` under your home directory.
Open up the new local copy of the file under your home directory in a text editor. You will see more information in the comments of the file about how the keys are laid out on your particular device. Under the _keymap_ section of the config file, you can edit the _code_ settings to point to different _target actions_ that Flowblade can perform, for each of the keys on the device.
Once your file is complete, save and close the file, and start Flowblade. Now your new custom key mappings will be in effect every time you run the program.
Take care not to introduce any XML errors into the file, or Flowblade will not be able to process it correctly.
See the next section for all of the target actions that can be mapped to the keys on your device.
Available Target Actions
| Target Action | Description |
|---|---|
| 3_point_overwrite | Three Point Overwrite |
| add_marker | Add Marker |
| append | Append |
| append_from_bin | Append Selected Media From Bin |
| clear_io_marks | Clear In/Out Marks |
| clear_mark_in | Clear Mark In |
| clear_mark_out | Clear Mark Out |
| cut | Cut Active Tracks |
| cut_all | Cut All Tracks |
| delete | Delete |
| display_clip_in_monitor | Display Clip In Monitor |
| display_sequence_in_monitor | Display Current Sequence In Monitor |
| enter_edit | Enter Editing Mode |
| faster | Faster |
| insert | Insert |
| lift | Lift |
| log_range | Log Range |
| mark_in | Mark In |
| mark_out | Mark Out |
| next_cut | Go To Next Cut |
| next_frame | Go To Next Frame |
| nudge_back | Nudge Move Selection Back 1 Frame |
| nudge_back_10 | Nudge Move Selection Back 10 Frames |
| nudge_forward | Nudge Move Selection Forward 1 Frame |
| nudge_forward_10 | Nudge Move Selection Forward 10 Frames |
| open_next | Open Next Media Item In Monitor |
| open_prev | Open Previous Media Item In Monitor |
| overwrite_range | Overwrite Range |
| play | Play |
| play_pause | Play / Pause |
| play_pause_loop_marks | Play / Pause Mark In to Mark Out Loop |
| prev_cut | Go To Previous Cut |
| prev_frame | Go To Previous Frame |
| resync | Resynchronization |
| select_next | Open Next Clip In Filter Editor |
| select_prev | Open Previous Clip In Filter Editor |
| sequence_split | Sequence Split |
| slower | Slower |
| stop | Stop |
| switch_monitor | Switch Monitor Display |
| to_end | Go To End |
| toggle_ripple | Toggle Ripple |
| to_mark_in | Go To Mark In |
| to_mark_out | Go To Mark Out |
| to_start | Go To Start |
| trim_end | Trim Clip End To Playhead |
| trim_start | Trim Clip Start To Playhead |
| zoom_in | Zoom In |
| zoom_out | Zoom Out |