
Flowblade Movie Editor uses Compositors to mix images from two different tracks.
Compositing Modes
The way that Compositors work is defined by a Compositing Mode. Users can select Compositing Mode to suit their preference or editing needs of a particular Sequence.
To set Compositing Mode for a Sequence select it from Sequence -> Compositing Mode sub menu.
Standard Full Track
This is the most simple and easiest to use Compositing Mode. No Compositors are needed. Fade In/Outs, Wipes and transforms are created with Filters. Some compositing functionality is not available. It is not possible to create node tree compositions
Compositor Free Move
This is the most powerful and complex Compositing Mode. Users can set destination tracks and positions of Compositors freely and create node tree compositions if needed.
Standard Full Track Compositing Mode
Compositing in Standard Full Track mode is similar to using layers in applications like Gimp and Photoshop.
Workflow
Creating layered compositions
- Add Clips on Timeline on different tracks.
- Images are composited in bottom to top order.
- Images with alpha channel are composited with transparency as defined by alpha channel.
- Use Filters to create Dissolves, Wipes, Blends and affine transforms.
Dissolves
- Add Clips on Timeline on different tracks.
- Add Fade In or Fade Out Filters to Clip on the upper track to create Dissolves with Clip on the lower track.
- Fade In and Fade Out Filters are in Fade Filter category.
Dissolves - Rendered Transition
- Select two Clips on the same track.
- Press Add Rendered Transition button in middlebar.
- Give length of rendered transition and press Render button.
Blends
- Add Clips on Timeline on different tracks.
- Add Blend Filter to Clip on the upper track to control blend mode used when compositing image on top of the Clip on the lower track.
- Blend Filters can be combined with other Filters to create compositions as wished.
- Blend Filters are in Blend Filter category.
Wipes
- Add Clips on Timeline on different tracks.
- Add Wipe Filters to the top Clip to create wipe transitions.
- Wipe Filters are in Blend Filter category.
Alpha channel manipulation: Keys, Rotomasks etc.
- Add Clips on Timeline on different tracks.
- Use appropriate Filters in Alpha Filter category to create more complex compositing opearations such as color keys, shaped masks or animated masks.
Transforms
- Add Clips on Timeline on different tracks.
- Add Position Scale or Position Scale Rotation Filters to the top Clip to move, rotate and scale image before it is composited on lower track.
- These Filters are in Transform Filter category.
Compositor Free Move Compositing mode
In this modes Compositors have a Source track and a Destination track.
On the Timeline a Compositor is displayed as a rectangular object on top of two tracks. Source track is always the one above Compositor, but Destination track may be any of the tracks below it.
Parameters defining the resulting image are edited in the Edit tab.
Workflow
By combining multiple tracks and multiple Compositors complex composite images can be achieved.
- Creating a Compositor
- Click Right Mouse on any clip on tracks from V5 to V2 and select for example Add Compositor -> Dissolve or Add Blender -> Softlight from popupmenu to create a new Compositor.
- Trimmimg or Moving a Compositor
- To trim Compositor start and end points: Press and drag Left Mouse near either end of Compositor on Timeline.
- To move Compositor: Press and drag Left Mouse in the middle of Compositor on Timeline.
- Editing Compositor Parameters in Compositors Tab
- Double click Compositor with Left Mouse.
- Click Right Mouse on any Compositor and select Open In Compositor Editor
- Edit parameters using value editors.
- Deleting Compositor
- Click Left Mouse on any Compositor to select it and press Delete key.
Compositor are executed from top to bottom in Top Down Compositing modes
In Flowblade Movie Editor the order of rendering is top-to-bottom, instead of bottom-to-top like in Gimp or Photoshop. When attempting certain type of multilayer composites this yields results that seem unintuitive, unless the user is aware of rendering order of Compositors.Rendering A Composited Frame
- For each frame it is checked if there is a Compositor covering this frame on the top most track.
- If such Compositor is found, do composite on Destination track.
- Frame on Destination track is now altered and if that frame is used as source the altered version is used
- Check if frame on next track below has compositor and if Compositor is found render the composite image
- This is done for each track.
- Output image on is from the topmost track that has media on the frame and does not have a compostor on the frame.
Using Filters
Exept for Blend Filter, all filters can used in the same way to achieve compositions as in Standard Free Move compositing mode.
EXAMPLE: Creating a 3-layer composite
In this example we demonstrate how top-to-bottom Compositor order affects compositing. We are trying to make word 'GO' appear on top of 2-color background made by combining red and blue Color Clips using 'Free Stripes' wipe.
Media Items and desired result
To make alpha transparency work the GO.PNG graphic has to composited using 'Dissolve'.
Clips: RED and BLUE Color Clips and GO.PNG graphic with alpha transparency

Desired result

Gimp/Photoshop style layer order yields wrong result
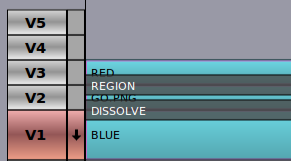
Here we have arranged clips on the tracks as we would arrange layers in Gimp.
Gimp style layer order

What happens here is that first 'GO.PNG' is composited on 'RED' Color Clip, and the resulting image is composited using 'Free Stripes' wipe on top of 'BLUE' Color Clip. We get the wrong result.
Wrong result

Correct layer order when compositing order is top-to-bottom
Here we have arranged clips in correct order for the desired result.
Correct layer order
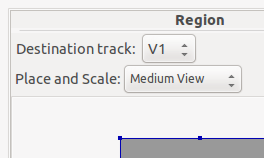
Here 'RED' Color Clip is first composited using 'Free Stripes' wipe on 'BLUE' Color Clip. After that 'GO.PNG' is composited on top of the resulting image (that is already rendered on track V1) using 'Dissolve' to get final output image.
Destination track in 'Region' Compositor is V1, Source track is V3
Desired result